Three video techniques for increasing student engagement
Joe Arton shares three evidence-based techniques for creating teaching and learning videos that will improve student engagement and learning outcomes

Created in partnership with

Created in partnership with
You may also like

Popular resources
The ways that students emotionally experience digital video impacts the approach they take to learning and ultimately the outcomes of that learning. The move to digital and hybrid teaching and learning in 2020 transformed the way digital videos were produced. There was a shift among practitioners from using professional-grade video production technologies, digital cameras and external audio equipment to individual laptop cameras, built-in microphones and videoconferencing software such as Microsoft Teams, Collaborate and Zoom.
This might be considered to be almost a democratisation of video production. Yet with this democratisation came some pitfalls for those who had little prior experience of video production. This resource identifies three evidence-based practices for individually created videos on MS Teams and similar platforms, which can increase the possibilities for student engagement with the subject matter.
1. Reduce power asymmetries with camera angles
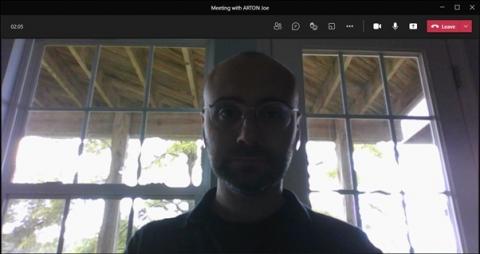
When producing digital videos with MS Teams, it is important to take a learner- or audience-centric approach and consider the effect that the formal features of the image have on the learner or audience. In the screenshot above (Figure 1), the laptop camera angle is positioned low on the vertical axis, below the eyeline of the presenter pointing upwards. Research into the influence of camera angles on comprehension and retention of pictorial events illustrates that when the viewer is forced to look “up” at a person on screen, they are perceived as more aggressive and powerful than when viewed from a high angle, which forces the viewer to look down. Using a low angle in an educational video establishes an asymmetrical power relationship between the presenter and the learner and reinforces the power asymmetries inherent in much of university education.
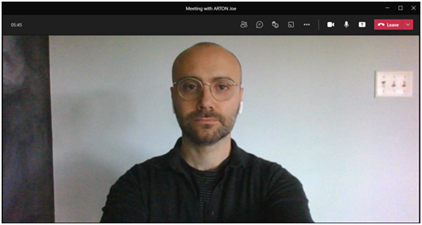
In contrast, in this screenshot (Figure 2), the laptop camera is at eye level, which establishes a neutral status for the presenter. Neutral, eye-level camera angles create a sense of parity with the audience and a perceived similarity to the presenter. Neutral camera angles have been linked to an increase in audience empathy in media research and allow teachers to take conscious, embodied actions that exhibit empathy with learners.
Best practice
-
Make sure that your laptop camera is head-on and at eye level.
-
Use a set of books, laptop stand or a higher table to make sure that your camera is at the same level as your eyes.
2. Reduce the opacity of learning with good lighting
Lighting defines the visual mood and cognitive and emotional environment for the audience or learner. Returning to Figure 1, notice how the presenter is backlit and their body functions as an opaque object blocking out the primary light source.
As a result, the image is made up primarily of dark tones with a high contrast between light and darkness on the screen. In film and media genres such as the contemporary crime or conspiracy thriller, the decantation of light is used as a metaphor for opacity and imperceptibility in knowledge, motivations or plot. It is worth being aware of how lighting sources can affect whether the video is likely to be engaging or alienating to our audience.
In contrast, Figure 2 shows the largest or key light source as directly in front of the presenter. Research shows that audiences associate warm, fontal lighting with positive attributes including transparency, vulnerability and, most importantly, openness. Unlike backlighting, frontal lighting signals to learners a teacher or lecturer who is more open and approachable.
Best practice
-
Make sure that your largest light source in the room, whether that is a window or lamp if there is no natural light, is directly in front of you or no more than 45 degrees from directly in front of you.
-
If you’re not using natural light, it’s worth reducing the brightness of your laptop screen so it doesn’t wash out the colour in your face. Try not to have too many competing light sources in the room as this can also reduce the quality of the image on the screen.
3. Make learning outcomes sound great
Sound has an outsized effect on student learning. In the same way that the acoustical design and external noises of a physical classroom can impact student learning, voices on video recordings need to be clear, open and understandable for students.
There are several risks to sound quality when producing individually created video recordings on platforms such as MS Teams. These include capturing unwanted background noises such as internal building sounds, computer fans, acoustical interference or feedback, additional voices, app notifications and traffic. For audiences or learners, poor sound quality can have a significant negative effect on the completion of activities that require careful listening, particularly for students for whom English is not their first language. To create an effective learning experience with video, it is important to control the audio quality and reduce imperfections and missing sounds by using the correct technology and methodology.
Best practice
-
Use an external headset or microphone and aim for your voice to travel off to the side, diagonally rather than straight into the microphone.
-
Close or turn off notifications on any other applications on your desktop when recording, and turn off or silence your mobile phone.
-
Depending on availability, record in a quiet, isolated room during the quietest part of the day so you can hear only the person talking.